SharePoint connector
OAuth 2.0 filesdocumentsConnect to SharePoint. Manage sites, documents, lists, and collaborative content
SharePoint connector
-
Install the SDK
Section titled “Install the SDK”Terminal window npm install @scalekit-sdk/nodeTerminal window pip install scalekit -
Set your credentials
Section titled “Set your credentials”Add your Scalekit credentials to your
.envfile. Find values in app.scalekit.com > Developers > API Credentials..env SCALEKIT_ENVIRONMENT_URL=<your-environment-url>SCALEKIT_CLIENT_ID=<your-client-id>SCALEKIT_CLIENT_SECRET=<your-client-secret> -
Set up the connector
Section titled “Set up the connector”Register your SharePoint credentials with Scalekit so it handles the token lifecycle. You do this once per environment.
Dashboard setup steps
Register your Scalekit environment with the SharePoint connector so Scalekit handles the authentication flow and token lifecycle for you. The connection name you create will be used to identify and invoke the connection programmatically. Then complete the configuration in your application as follows:
-
Set up auth redirects
-
In Scalekit dashboard, go to AgentKit > Connections > Create Connection. Find SharePoint and click Create. Copy the redirect URI. It will look like
https://<SCALEKIT_ENVIRONMENT_URL>/sso/v1/oauth/<CONNECTION_ID>/callback.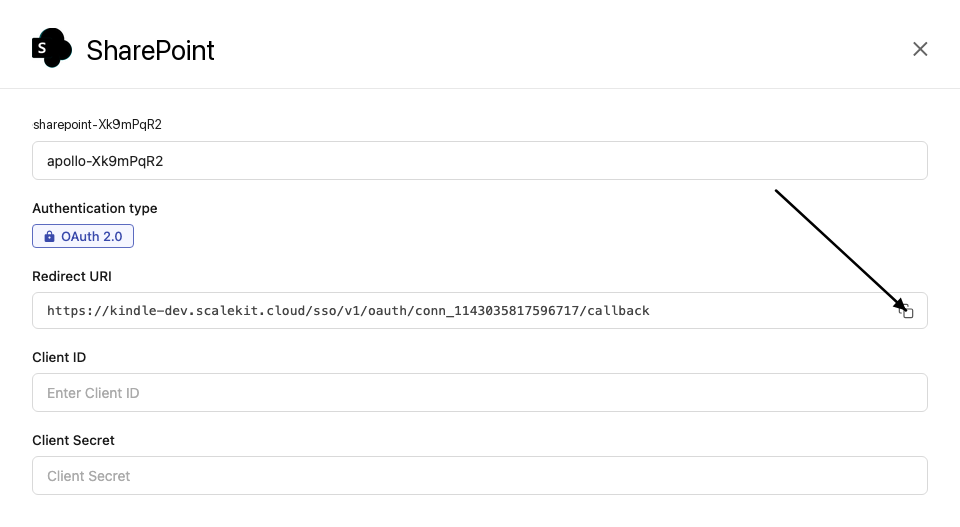
-
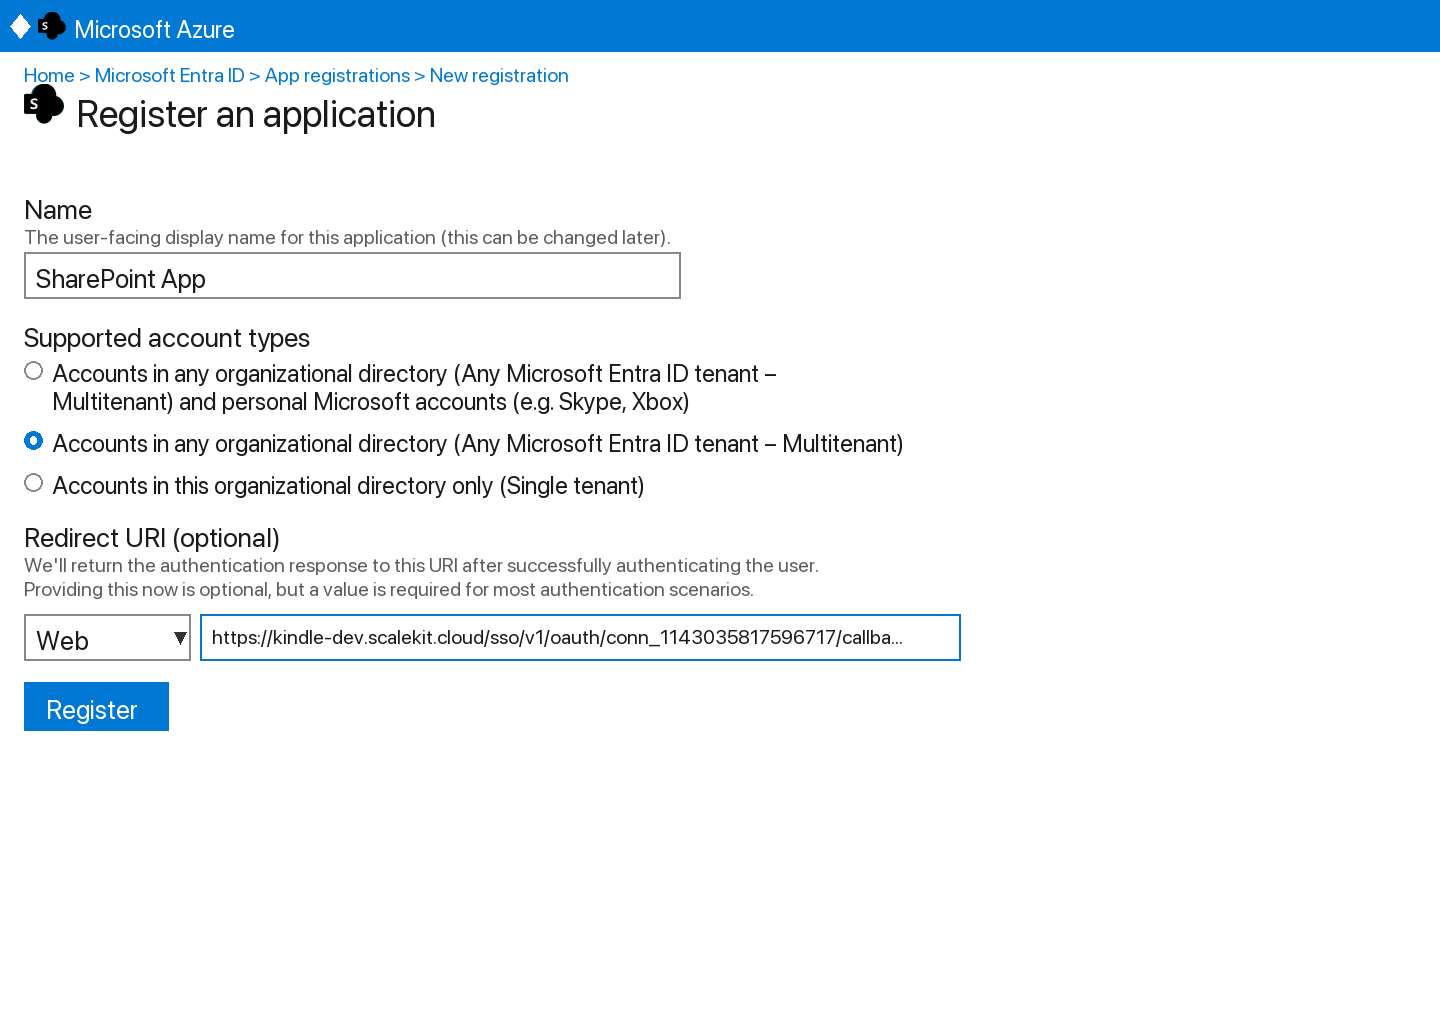
Sign into https://entra.microsoft.com and go to Microsoft Entra ID → App registrations → New registration.
-
Enter a name for your app.
-
Under Supported account types, select Accounts in any organizational directory (Any Azure AD directory - Multitenant).
-
Under Redirect URI, select Web and paste the redirect URI from step 1. Click Register.
-
-
Get your client credentials
-
Go to Certificates & secrets → New client secret, set an expiry, and click Add. Copy the Value immediately.
-
From the Overview page, copy the Application (client) ID.
-
-
Add credentials in Scalekit
-
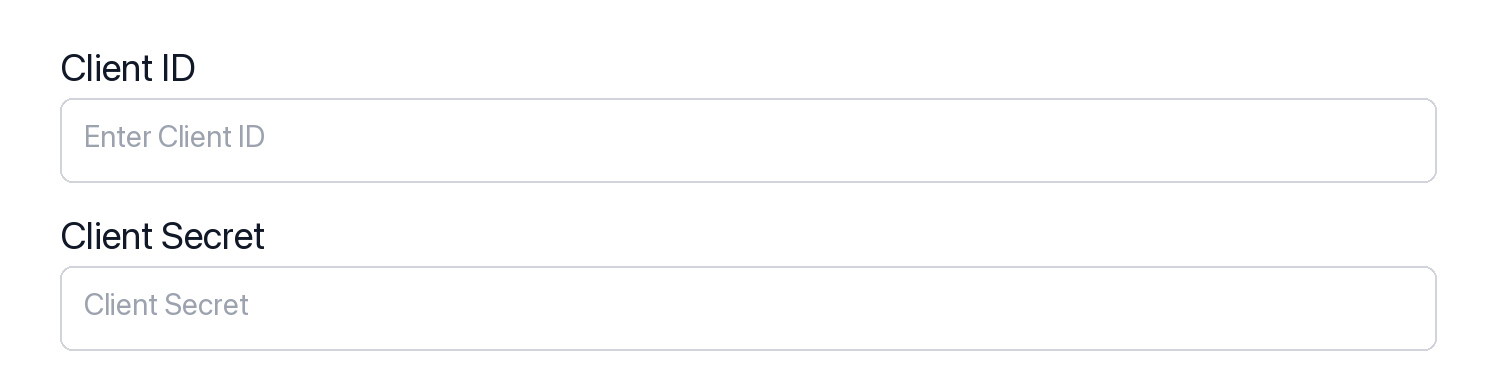
In Scalekit dashboard, go to AgentKit > Connections and open the connection you created.
-
Enter your credentials:
- Client ID (Application (client) ID from Azure)
- Client Secret (from Certificates & secrets)
- Permissions (scopes — see Microsoft Graph permissions reference)
-
Click Save.
-
-
-
Authorize and make your first call
Section titled “Authorize and make your first call”quickstart.ts import { ScalekitClient } from '@scalekit-sdk/node'import 'dotenv/config'const scalekit = new ScalekitClient(process.env.SCALEKIT_ENV_URL,process.env.SCALEKIT_CLIENT_ID,process.env.SCALEKIT_CLIENT_SECRET,)const actions = scalekit.actionsconst connector = 'sharepoint'const identifier = 'user_123'// Generate an authorization link for the userconst { link } = await actions.getAuthorizationLink({ connectionName: connector, identifier })console.log('Authorize SharePoint:', link)process.stdout.write('Press Enter after authorizing...')await new Promise(r => process.stdin.once('data', r))// Make your first API call through the proxyconst result = await actions.request({connectionName: connector,identifier,path: '/v1.0/me/sites',method: 'GET',})console.log(result)quickstart.py import osfrom scalekit.client import ScalekitClientfrom dotenv import load_dotenvload_dotenv()scalekit_client = ScalekitClient(env_url=os.getenv("SCALEKIT_ENV_URL"),client_id=os.getenv("SCALEKIT_CLIENT_ID"),client_secret=os.getenv("SCALEKIT_CLIENT_SECRET"),)actions = scalekit_client.actionsconnection_name = "sharepoint"identifier = "user_123"# Generate an authorization link for the userlink_response = actions.get_authorization_link(connection_name=connection_name,identifier=identifier,)print("Authorize SharePoint:", link_response.link)input("Press Enter after authorizing...")# Make your first API call through the proxyresult = actions.request(connection_name=connection_name,identifier=identifier,path="/v1.0/me/sites",method="GET",)print(result)
Common workflows
Section titled “Common workflows”Proxy API call
const result = await actions.request({ connectionName: 'sharepoint', identifier: 'user_123', path: '/v1.0/me/sites', method: 'GET',});console.log(result);result = actions.request( connection_name='sharepoint', identifier='user_123', path="/v1.0/me/sites", method="GET")print(result)Download a file
Fetch file metadata via the Scalekit proxy to get a pre-authenticated download URL, then stream the file directly from Microsoft’s CDN. This avoids buffering large files through the proxy and is significantly faster.
import osimport requests
site_id = "<YOUR_SITE_ID>" # call GET /v1.0/sites/root to get your site ID
filename = "report.pdf"
response = actions.request( connection_name='sharepoint', identifier='user_123', path=f"/v1.0/sites/{site_id}/drive/root:/{filename}", method="GET", query_params={},)meta = response.json()
# Step 2: Stream directly from Microsoft CDN using the pre-authenticated URL# No auth headers needed — the URL is cryptographically signed and expires in ~1 hourdownload_url = meta["@microsoft.graph.downloadUrl"]
with requests.get(download_url, stream=True) as r: r.raise_for_status() with open(filename, "wb") as f: for chunk in r.iter_content(chunk_size=8 * 1024 * 1024): # 8 MB chunks f.write(chunk)
print(f"Downloaded: {filename} ({os.path.getsize(filename):,} bytes)")Upload a file
Upload a file to SharePoint’s Shared Documents folder. Scalekit injects the OAuth token automatically — your app never handles credentials directly.
import mimetypes
site_id = "<YOUR_SITE_ID>" # call GET /v1.0/sites/root to get your site ID
filename = "report.pdf"with open(filename, "rb") as f: file_bytes = f.read()
mime_type = mimetypes.guess_type(filename)[0] or "application/octet-stream"
response = actions.request( connection_name='sharepoint', identifier='user_123', path=f"/v1.0/sites/{site_id}/drive/root:/{filename}:/content", method="PUT", query_params={}, form_data=file_bytes, headers={"Content-Type": mime_type},)
meta = response.json()print(f"Uploaded: {meta['name']} → {meta['webUrl']}")Execute a tool
const result = await actions.executeTool({ connector: 'sharepoint', identifier: 'user_123', toolName: 'sharepoint_list', toolInput: {},});console.log(result);result = actions.execute_tool( tool_input={}, tool_name='sharepoint_list', connection_name='sharepoint', identifier='user_123',)print(result)