ServiceNow connector
OAuth 2.0 customer_supportConnect to ServiceNow. Manage incidents, service requests, CMDB, and IT service management workflows
ServiceNow connector
-
Install the SDK
Section titled “Install the SDK”Terminal window npm install @scalekit-sdk/nodeTerminal window pip install scalekit -
Set your credentials
Section titled “Set your credentials”Add your Scalekit credentials to your
.envfile. Find values in app.scalekit.com > Developers > API Credentials..env SCALEKIT_ENVIRONMENT_URL=<your-environment-url>SCALEKIT_CLIENT_ID=<your-client-id>SCALEKIT_CLIENT_SECRET=<your-client-secret> -
Set up the connector
Section titled “Set up the connector”Register your ServiceNow credentials with Scalekit so it handles the token lifecycle. You do this once per environment.
Dashboard setup steps
Register your Scalekit environment with the ServiceNow connector so Scalekit handles the authentication flow and token lifecycle for you. The connection name you create will be used to identify and invoke the connection programmatically. Then complete the configuration in your application as follows:
-
Set up auth redirects
-
In Scalekit dashboard, go to AgentKit > Connections > Create Connection. Find ServiceNow and click Create.
-
Click Use your own credentials and copy the redirect URI. It looks like
https://<SCALEKIT_ENVIRONMENT_URL>/sso/v1/oauth/<CONNECTION_ID>/callback.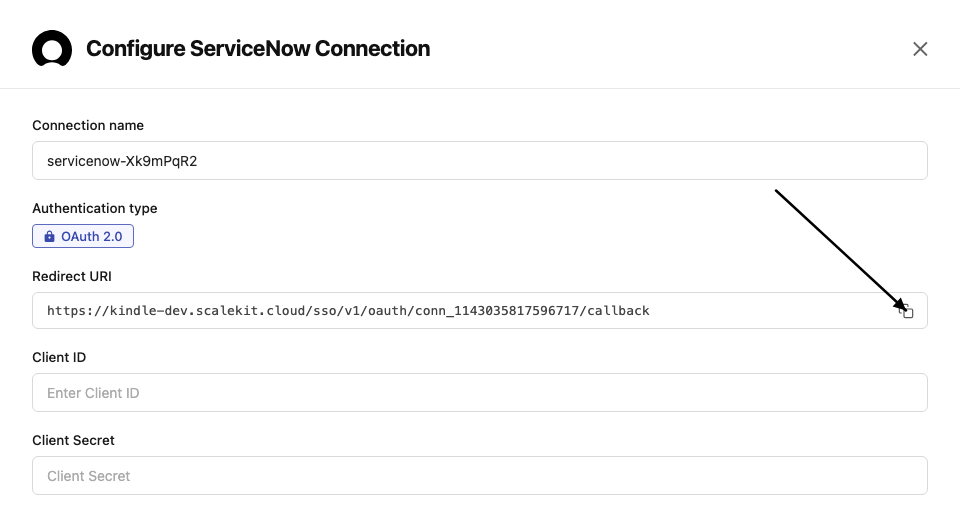
-
In the ServiceNow Developer Portal, go to your instance and click Manage instance password to find your instance URL.

-
Log into your ServiceNow instance, navigate to System OAuth → Application Registry, and click New → Create an OAuth API endpoint for external clients.
-
Fill in an app name and paste the copied URI into the Redirect URL field, then click Submit.
-
-
Get client credentials
After submitting, open the newly created record in System OAuth → Application Registry:
- Client ID — auto-generated, listed under Client ID
- Client Secret — click the lock icon next to Client Secret to reveal it
-
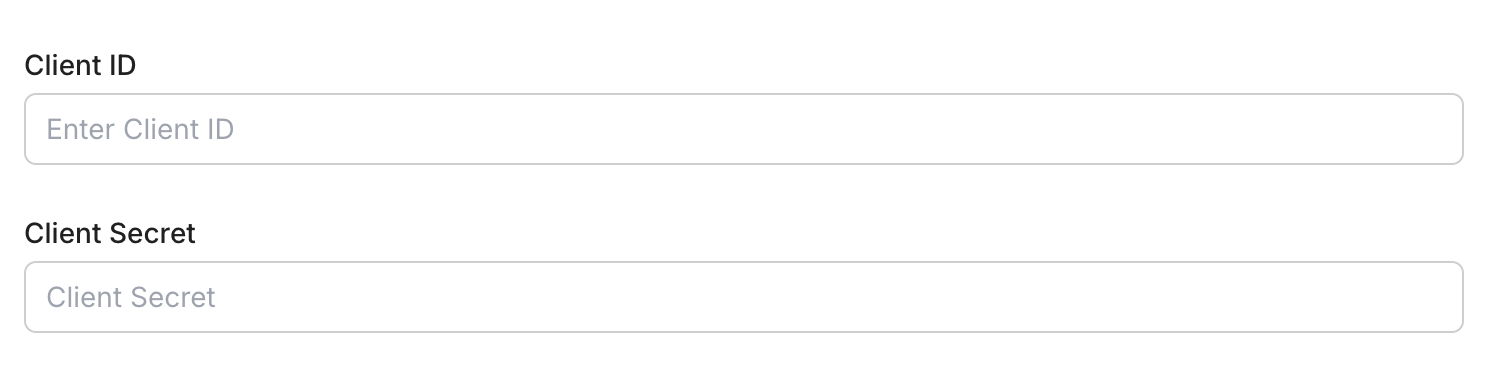
Add credentials in Scalekit
-
In Scalekit dashboard, go to AgentKit > Connections and open the connection you created.
-
Enter your credentials:
- Client ID (from your ServiceNow Application Registry)
- Client Secret (from your ServiceNow Application Registry)
-
Click Save.
-
-
-
Authorize and make your first call
Section titled “Authorize and make your first call”quickstart.ts import { ScalekitClient } from '@scalekit-sdk/node'import 'dotenv/config'const scalekit = new ScalekitClient(process.env.SCALEKIT_ENV_URL,process.env.SCALEKIT_CLIENT_ID,process.env.SCALEKIT_CLIENT_SECRET,)const actions = scalekit.actionsconst connector = 'servicenow'const identifier = 'user_123'// Generate an authorization link for the userconst { link } = await actions.getAuthorizationLink({ connectionName: connector, identifier })console.log('Authorize ServiceNow:', link)process.stdout.write('Press Enter after authorizing...')await new Promise(r => process.stdin.once('data', r))// Make your first API call through the proxyconst result = await actions.request({connectionName: connector,identifier,path: '/api/now/table/sys_user',method: 'GET',})console.log(result)quickstart.py import osfrom scalekit.client import ScalekitClientfrom dotenv import load_dotenvload_dotenv()scalekit_client = ScalekitClient(env_url=os.getenv("SCALEKIT_ENV_URL"),client_id=os.getenv("SCALEKIT_CLIENT_ID"),client_secret=os.getenv("SCALEKIT_CLIENT_SECRET"),)actions = scalekit_client.actionsconnection_name = "servicenow"identifier = "user_123"# Generate an authorization link for the userlink_response = actions.get_authorization_link(connection_name=connection_name,identifier=identifier,)print("Authorize ServiceNow:", link_response.link)input("Press Enter after authorizing...")# Make your first API call through the proxyresult = actions.request(connection_name=connection_name,identifier=identifier,path="/api/now/table/sys_user",method="GET",)print(result)
Common workflows
Section titled “Common workflows”Don’t worry about your ServiceNow instance domain in the path. Scalekit automatically resolves {{domain}} from the connected account’s configuration. For example, a request with path="/api/now/table/sys_user" will be sent to https://mycompany.service-now.com/api/now/table/sys_user automatically.
Proxy API call
const result = await actions.request({ connectionName: 'servicenow', identifier: 'user_123', path: '/api/now/table/sys_user', method: 'GET',});console.log(result);result = actions.request( connection_name='servicenow', identifier='user_123', path="/api/now/table/sys_user", method="GET")print(result)Execute a tool
const result = await actions.executeTool({ connector: 'servicenow', identifier: 'user_123', toolName: 'servicenow_list', toolInput: {},});console.log(result);result = actions.execute_tool( tool_input={}, tool_name='servicenow_list', connection_name='servicenow', identifier='user_123',)print(result)